Learn The Right Way To Grout A Mosaic Kitchen Backsplash
April 02, 2019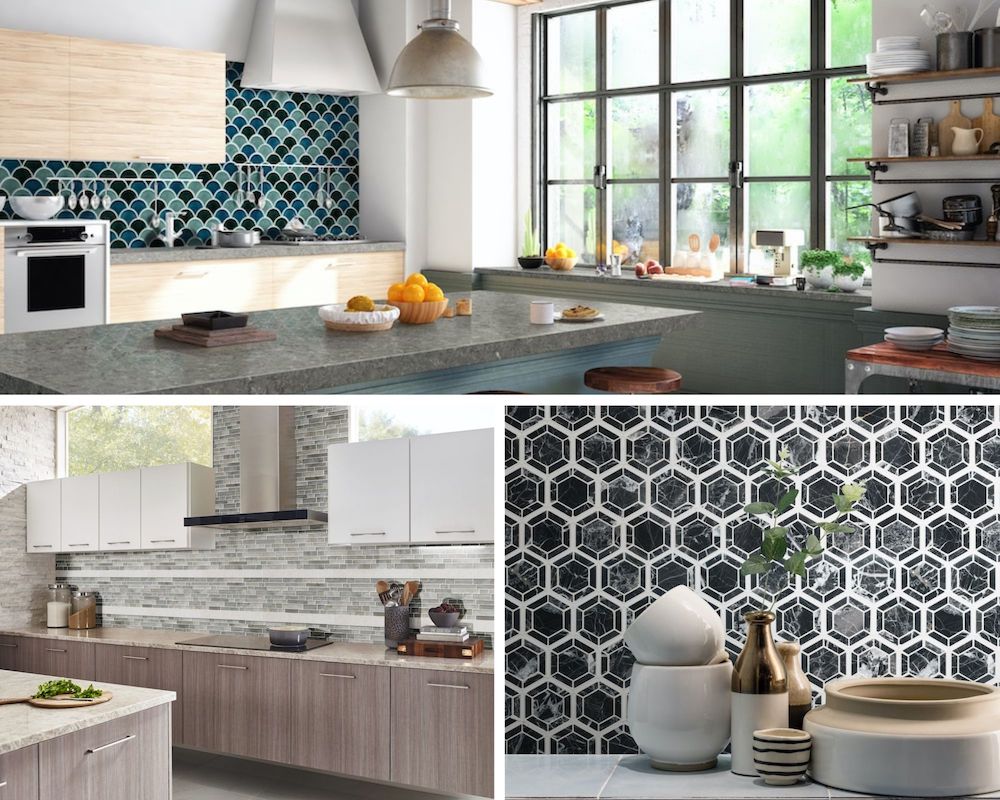
We all know that DIY is a great way to save a bundle on home updates and renovations. But what if you’re a beginner? We all must start somewhere, and installing a mosaic kitchen backsplash is an easy way to make a big difference in the look of your kitchen!
As DIY projects go, installing wall tile in most kitchens is highly recommended. For one thing, it’s relatively inexpensive, depending on which type of mosaic tile you choose. Also, you don’t need a lot of skill or expensive, specialized equipment; you may not even need to cut the tile. Finally, it’s a project you can easily spread over two weekends — one to install the tile and the second weekend to grout it.
What you do need, however, is the patience to follow instructions and do it right. Here’s a guide offering instructions and tips that should give you the confidence you need to succeed.
Choose Your Grout

Hexagono Nero Polished Wall Tile
Once you’ve chosen your tile mosaic, you need to choose the right grout for your project. Once again, you have options because there is more than one type of grout.
Colored grout can create different effects. For example, matching the grout to your tile color can make the pattern subtler. Choosing a grout that is either much lighter or much darker than the tile will make backsplash designs “pop,” emphasizing the lines and shapes of each individual tile in the mosaic. Grout is usually available in neutral colors, but some suppliers may offer others, including blue or red.
Unsanded grout is the best choice for mosaic backsplash tile because the grout lines are smaller. Grout that is sanded offers a stronger bond, but that is more important for larger tiles and for areas that have a lot of wear and tear, such as floors and showers. Unsanded grout is also best for glass or metal tile because sand may scratch the tile surface.
Silicone or latex-based grout should be used at the bottom of the tile installation where the tile meets the kitchen countertop. This area often experiences slight shifting, and it’s possible that cracks could develop if powdered grout is used instead.
Materials Needed
- Grout
- Two buckets
- Plastic sheeting
- Painters tape
- Putty knife
- All-purpose sponges
- Grout float
- Soft cloths
- Silicone caulk
- Grout sealer
Plus, obviously, you will need a tile mosaic backsplash that has been properly installed. Let it dry for 24 to 48 hours before applying grout.
Step By Step

- Mix the grout in a bucket with the putty knife. Follow the manufacturer’s instructions. When it’s ready, the consistency should be similar to peanut butter or icing.
- Using your grout float, spread the grout over your backsplash tile. Spread it upward and press it firmly between each tile, working at a 45-degree angle.
- Let the grout dry for 10 to 15 minutes while you fill your second bucket with warm water.
- Use the sponge and warm water to wipe away excess grout from the tile mosaic. The sponge should be damp, not wet and dripping. Be sure to rinse your sponge regularly as you go along. You may want more than one bucket of water for this process, and you may need to empty the bucket and use fresh water occasionally.
- Let the grout dry for a few hours, or, ideally, overnight.
- Use a soft cloth to go over the tile once more to make sure no grout film is left on the surface.
- Seal your grout, following the manufacturer’s instructions, to protect your grout from damage and stains.
- Apply caulk to the line where the backsplash tile meets the countertop, windows, or any other surfaces. Go over the line with a damp sponge, then use your finger to press the caulk gently into the perfect line. Use the damp sponge once more to smooth it out.
- After a day or two, you may find that there is still a “haze” on your tile, and it’s not as shiny as it should be. You can remove this using a piece of cheesecloth, Magic Eraser, or a soft rag.
Tips For Success

Savoy Interlocking Pattern 8mm Glass Tiles
- Selecting the perfect backsplash tile mosaic for your kitchen backsplash may be the most difficult part of the process. There are so many colors, shapes, tile sizes, textures, and materials to choose from! Not only that, but with some types of mosaic, you can also change the look totally by installing in a different direction. Using a design tool like MSI’s Virtual Kitchen Designer can take a lot of the guesswork out of the process. Most tile mosaics come pre-assembled on mesh sheets, which means you don’t need to worry about spacing each tile or assembling an intricate pattern.
- Before installing the wall tile, lay it out in advance. That way, you know for certain that you’ve got the right amount of tile for the job and exactly where each piece will go. It’s especially important to plan for transitions: light sockets, electrical outlets, cabinet edges, a dip in the countertop, and windowsills, just to name a few.
- Be sure to cover everything with plastic. Secure a layer of plastic sheeting over all countertops with painter’s tape. Even the most careful application of grout will splatter, and it’s a lot easier to take extra precautions than to clean it off later.
- Use good lighting, and don’t grout if you’re tired. Poor lighting and carelessness can end up costing a lot of money to repair later.
- If your backsplash is large and requires a lot of grout, you may prefer to use an electric drill with a mixing drill bit.
- Use gloves to protect your hands while applying grout. It’s easy to wash off but can make your skin feel very dry.
A tile backsplash adds so much value to your home without a large expenditure of effort and money. When your grout is all dry, and your tile is all clean and polished, you can be proud of the DIY project you’ve just completed and will enjoy it for years to come.
For more detailed information on vinyl flooring, including installation costs for Luxury Vinyl Flooring, visit our website for our entire line of luxury vinyl planks.
Are you ready to get your DIY project started? First, find your backsplash tile by reviewing MSI’s expansive Backsplash Tile Collection, then find and visit an MSI Backsplash Tile Dealer in your area.
Explore our full range of mosaics online! Need more details? Chat with us now, stop by an MSI showroom, or find an authorized MSI dealer in your area.
READ MORE ABOUT DIFFERENT TYPES GROUT
Sanded Vs. Non-Sanded Grout Backsplash
Tricks To Cleaning the Grout On Your Kitchen Backsplash
The Difference Between Sanded Vs. Un-sanded Grout For Backsplash Tile