Installing Luxury Vinyl Flooring In The Bathroom
November 26, 2019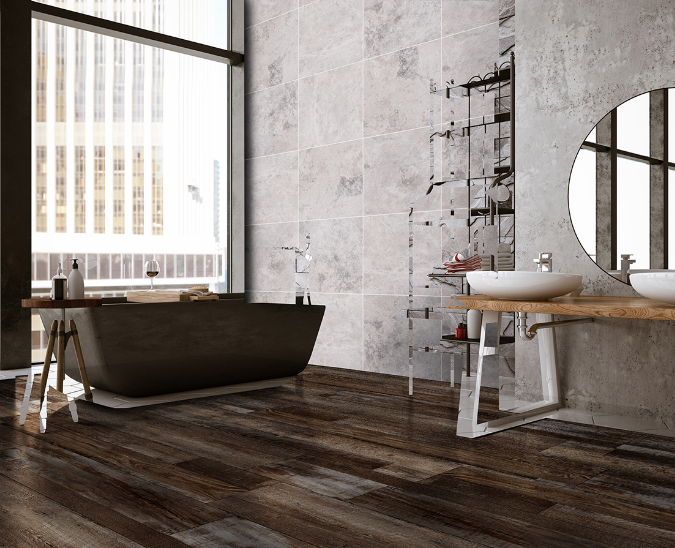
One of the many reasons why luxury vinyl flooring (LVF) has become so increasingly popular is because of its application versatility. LVF can be installed just about anywhere, including enormous master retreats to comfortable full-size bathrooms to petite half baths. With wood look luxury vinyl plank flooring from MSI’s Everlife Collection, you can have a high-end hardwood look without a high-end price tag or the worry of water damage. And, if you’re adding vinyl to adjoining rooms, then you’ll enjoy a seamless look from one space to another instead of stopping the wood at the door. Just know that any new flooring requires proper preparation and installation. Whether you’re a novice or an advanced DIY-er, carefully follow these luxury vinyl installation tips and tricks to help accomplish professional results for your new LVF bathroom addition.
Glue-Down vs. Click-Lock
MSI offers two versatile lines of luxury vinyl flooring: Everlife’s DryBack and Rigid Core collections. The DryBack line, which features flexible glue-down vinyl flooring, can be installed in the bathroom over a subfloor, but it does require a vinyl floor adhesive. The Rigid Core line, a 100-percent waterproof vinyl plank flooring, comes with an easy click-locking system that floats over your existing subfloor or bathroom floor. The pre-attached underlayment (IXPE) is a closed-cell backing that is 100-percent waterproof, so it’s a resilient product that’s perfect for wet areas like a full or half bathroom.
Also, all Everlife LVP Flooring products include a CrystaLux wear layer that protects against scratches, stains, and even sun damage. Unlike cold, hard floor, MSI’s LVF feels soft and warm underfoot during any season, so you will feel comfortable walking on your new LVF even when barefoot. These are just some of the reasons why it has become so popular to use luxury vinyl flooring in the washroom.
LVF Bathroom Installation Instructions
The following installation instructions are for the Everlife Rigid Core click-lock products with a simple angle joint assembly. Everlife Rigid Core is excellent for same-day installations since they don’t require acclimation. Instead, let the planks reach room temperature before installing them. It is crucial that the wood or concrete subfloor or existing floor is solid and sound before installing your floating floor. And if you’re working on a full remodel, then permanent fixtures like vanities, cabinets, and tubs would need to be put in place first in order to finish the LVP Flooring around them.
When you’re ready to tackle your DIY luxury vinyl project, start by measuring the length of the bathroom. Then, divide that measurement by the length of the planks. Measure the width of the bathroom and divide that number by the width of the planks. Make sure to account for a 1/4-inch gap around the perimeter. You want to avoid a length measurement that’s less than 8 inches and a width measurement that’s less than half the width of the plank. If either occurs, then cut the first and last rows to be equal lengths or equal widths. This will create a more balanced look instead of having a short end piece or skinny side row.
Once you’ve marked your luxury vinyl planks, score it using a utility knife and straight edge and snap off the excess. You can also use a floor cutter for cleaner cuts. Add the 1/4-inch spacers around the perimeter to allow for expansion, and start in the left hand corner of the bathroom. For the first piece of your first row, start with the planks’ tongue facing the wall. Next, angle and click together the two pieces until they’re fully locked, which means it sits flat on the subfloor. Continue the process of angling and clicking pieces until you’ve finished the first row of vinyl planks.
For your second row, measure, score, and cut your first plank so that it’s staggered a minimum of 8 inches from the first row. Angle and connect the short side first and then connect the long side. Use a tapping block to create a tight joint at the seam. Continue with a staggered pattern for a more natural look. Wooden door casings are best cut so that the LVF slides underneath it, but don’t ever cut a metal door casing. Remember that baseboard molding or quarter round will cover the cut edges along the wall, and finally add transitions between flooring if you’re not continuing your LVF outside the bathroom.
Important LVF Bathroom Installation Tips
Two of the most important installation areas in the bathroom are around the toilet and shower or tub because of the potential for moisture exposure. To install luxury vinyl flooring around the toilet, score the LVP around the curved shape of the toilet base and then use pliers to snap off any excess. For all vinyl edges exposed to the toilet flange or shower edge, you must properly seal them using silicone caulk. This will help avoid water from building up underneath the floor and potentially leading to not only mold issues but also weakened flooring from water saturation. You can also check out this article for more info on how to install luxury vinyl planks.
With MSI’s Everlife LVP Flooring line, you can finally give your bathroom the upgrade it deserves. Not only does it look like real hardwood, but it also provides optimal performance as a result of its durable layers and waterproof backing. These are just some of the reasons why luxury vinyl tile is a good investment. For even more detailed directions on how to add LVP Flooring to your bathroom, watch this YouTube video for full installation instructions. But, if you have more questions about vinyl flooring, then be sure to check out the luxury vinyl flooring guide to get all of the pertinent info you need about this popular product.
A DIY project in the making, there’s no easier way to replace laminate flooring, or carpet than installing LVF (Luxury Vinyl Flooring). From prep work and step-by-step instructions to tips, tools, and materials, follow these vinyl flooring installation instructions for everything you need to know to achieve professional results. You could get started today and be done in just a few days – and with professional, polished results. If that sounds attractive to you, read Luxury Vinyl installation best practices for optimal results.
Would you like to learn more about Luxury Vinyl Flooring? Read the Definitive Guide to Luxury Vinyl Flooring to learn everything you need to know. And check out these vinyl flooring videos to learn more about LVP flooring styles, LVP installation, and maintenance.
Check out this luxury vinyl flooring pricing guide to learn more about costs. And here are some options on where to purchase luxury vinyl flooring.
For more detailed information on vinyl flooring, including installation costs for Luxury Vinyl Flooring, visit our website for our entire line of luxury vinyl planks.
Are you ready to get your DIY project started? First, find the perfect Luxury Vinyl Plank flooring by reviewing MSI’s expansive Luxury Vinyl Flooring Collection, then find and visit an MSI Luxury Vinyl Flooring Dealer in your area.
MORE ON LUXURY VINYL FLOORING
5 Reasons to Use Luxury Vinyl Flooring
The Definitive Guide to Luxury Vinyl Flooring
Is Luxury Vinyl Flooring a Good Investment?
Why Luxury Vinyl Flooring Is a Smart Choice for Your Bathroom