Step 1: Excavation & Existing
Sprinkler Removal
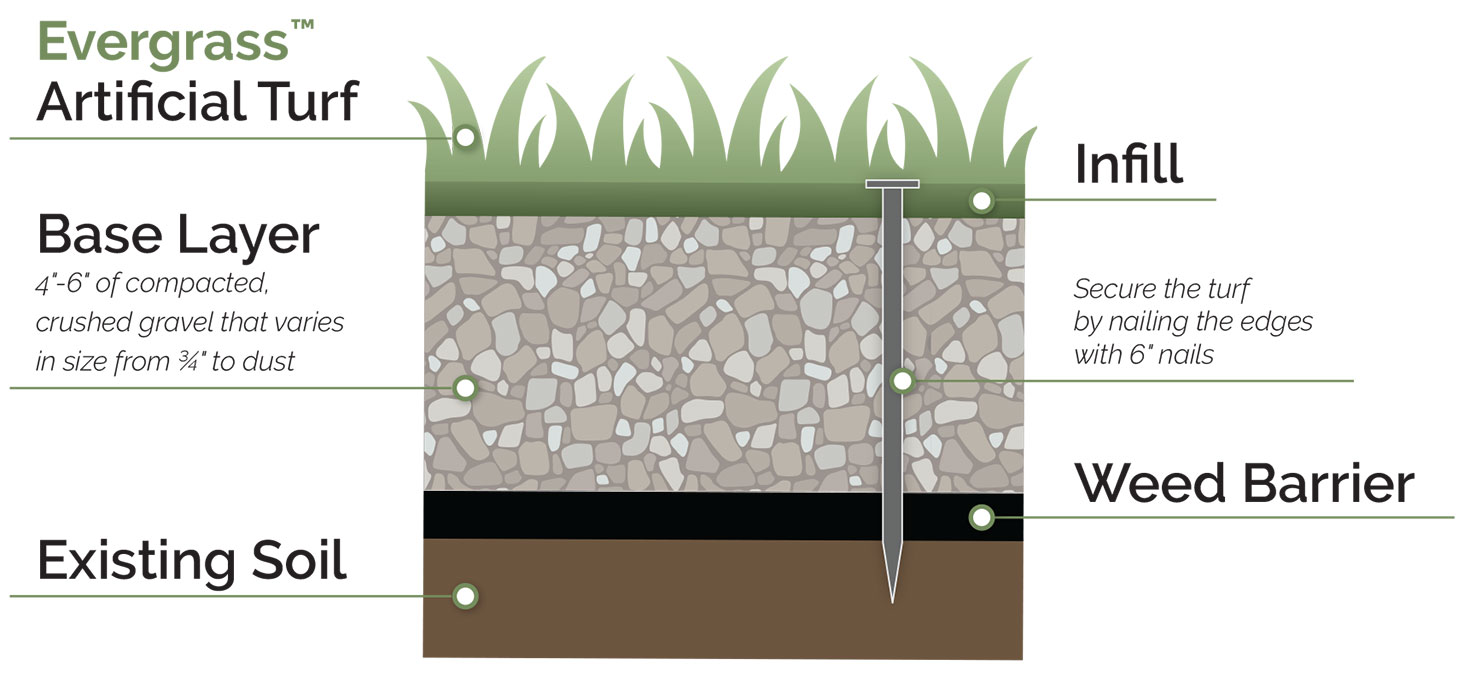
Remove 4”- 6” of dirt below the level
at which you want the turf. Beware of
irrigation and electrical lines which
may be located under the project
area. Either completely remove
sprinkler lines or remove and cap
sprinkler heads. Cap sprinklers at the
pipe level as opposed to the rising
to avoid any leakage that may occur
between the two.
Step 2: Base Preparation
After removing the dirt, compact the
soil using a 5000lb plate compactor.
This will increase the soil’s load
bearing strength and prevent settling.
Then, install a weed barrier on top. If
desired, lay down gopher wire and
use landscape staples to hold it in
place. Do not install plastic under the
turf as it will entrap water, causing
other problems.
Step 3: Compacting Base
Place base material over the weed
barrier and compact it in 3”=4”
increments. Water can be added
to assist in compaction. Once again,
use a 5000lb plate compactor to
compact the base. The base material
should be a crushed gravel that
varies in size from ¾” to dust and may
be fortified with a small amount of
cement to stiffen after installation.
Ensure you slope the base away from
the house and towards drainage area.
Step 4: Turf Layout
Ensure to measure the project area
and carefully design the layout to
minimize the number of seams in
the turf. Unroll the turf and stretch
across the top of the prepared base.
Make sure not to drag it across. If the
synthetic turf has a wrinkle; allow it
to acclimate in the sun. Due to the
natural direction of the turf blades,
separate pieces of turf must be laid
in the same direction.
Step 5: Turf Cutting
Cuts can be made using a long
pile carpet cutter or a carpet knife.
All cuts must be made from the
backside of the turf. This will ensure
you see the stitched rows.
Step 6: Secure the turf
Secure the turf by staking the edges
with 6 inch nails. Place the nails six
inches apart. Nails used in the field
should be applied as necessary to
prevent movement of turf.
Step 7: Seams
You can choose the seam 2 straight
edges together or use the “S” cut
method using a custom stencil. Either
way, make sure the stitch lines match
so the seams will be practically
unseen. The “S” cut method is a more
advanced process, but may give you
a more natural appearance. Once
you have your seams cut, straight
or “S”, pull both pieces of turf back
exposing the base. Place the seam
tape with half of the tape under each cut.
Use a synthetic turf adhesive and apply to the seam tape. Fold the two sections of artificial grass over seaming material to form one seamless piece. Secure seams with U-nails spaced six inches apart.
Step 8: Tucking Turf Edges
Tucking the turf involves hiding
the edges of the turf against any
hardscape or edging boarder by
using a wonder bar. The side edges
of the turf give it a good clean plush
look.
Step 9: Applying Filler
Spread Wonderfill material evenly
utilizing a drop spreader (the type
commonly used to spread grass
seed), or a flat. Do not attempt to
install the infill material while the
synthetic grass or the infill material is
wet. Once all sand is spread evenly
on top of turf it will need to be
broomed into the turf fibers. Use a
power broom to brush up turf fibers
and let the sand work in between the
turf blades. When the infill process
is complete, water the entire area
evenly with a hose to settle the
material. This acts as a balance to
hold the blades upright and gives the
turf more weight.
Zeolite infill can be used in combination with our Wonderfill 1lbs/ 1lbs,
or it can be used alone as an infill. Zeolite helps control order.
It absorbs toxins and neutralizes order. Zeolite is mainly used as a Pet Infill.
Step 10: Final Groom
The final grooming step involves
power brushing the turf once
again, lightly, to force the wonderfill
granules into the base of the turf for
settling and optimal stability.
MSI’s Evergrass offers everything you need to install our premium artificial turf. Learn more about our Turf Accessories! Take a Look